In the newest issue of Wooden Boat Magazine there is an article about a small boat, the Westport Pond Skiff. It is an older sheltered water sailing skiff, one of the simplest of boats to build. I am well aware of the simplicity of the skiff type boat to build and of the great return of satisfaction that is gained in a handsome and useful boat.
I understand that most of the yacht/boat clubs in my area have one class groups for racing, most all fiberglass boats, purchased boats, and I think that they are missing another dimension of boating that can be just as rewarding, if not more so, than just racing boats, and that is building boats.
The simple design of a skiff makes it a good candidate for club building, youth programs, and with minimal requirements in tools, space, or even expertise. Some may object to wooden boats in that they require "too much maintenance, but that annual work, if it could be called that, is part of the joy and the investment that creates the bond between sailor and vessel. In this age of consumerism, the age of disposable things, and things that are acquired rather than created, wouldn't this kind of pride of ownership and pride of craft, this kind of stewardship, be the kind of qualities we'd like to see developed in ourselves and most importantly, in our children.
I am no racer, I have no interest in it. The idea of running around buoy's, somebody else's idea of an interesting path, just leaves me cold. The idea that it develops young peoples skills for life supposes that their futures will be about "beating" others, about raising up themselves only. I realize that many of these club racing seasons are merely excuses to have a beer with friends, but I really don't need and excuse to share time with friends and I would much rather have a more genuine adventure, less structured and not clothed in competition which is a much overrated condition that is given far to much importance in this land of plenty that we call our country(culture and age).
When on land I would much rather find a path thru the woods then find myself on a 4 or 5 or 6 lane blacktop highway, so why would I want to force a race course upon the water to race around, when the entirety of the water's surface is open to me and I won't leave a mark upon it as I pass over, just as no other paths have been left for me to follow?
I am much more fond of what I call the "Swallows and Amazons" attitude of sailing and boating. Ratty's famous quote also comes to mind when I think of my time in and on the water, "There is nothing, absolutely nothing, half so much worth doing as messing about in boats, simply messing about". These outlooks are almost the antithesis of racing and competition, unless I suppose you are imagining you are a pirate and your friends in their boat are carrying trunks of treasure to be taken from them.
The waters here where I live offer an almost limitless possibility in that they are bays on a river and a days sail south is the atlantic ocean and thus all the seas of the world. That literal connection allows for imagined adventure on every sail. Even if one stays up the river all your days, just bouncing from one shore to the other, up and down the bay, there is always that little fantasy, lurking in the back of the brain about pushing over the helm and loosing a sheet and heading down river and out to the sea. It is a real possibility with each sail that is kept as a fantasy by greatest effort to resist the call of adventure, or maybe with little effort by just continuing to tack from shore to shore as one usually does.
The really wonderful thing about this area is that the 3 bays, or so, all link together make for a little inland sea, if one uses ones creative mind to think about it. Only 3 miles wide at it's widest, but about 20 miles from top to bottom, by choosing a couple of points that are obvious geographically as well as very good boating destinations. If one is in a small boat, or even a medium size boat, tacking from eastern shore to western can take half an hour or more. Plenty of time to relax and enjoy the view, but not so long as to get bored without something to do. If one is in a small boat and has a shallow draft that will allow beaching then there are many state parks and such to land on and picnic or stretch or just add another dimension to the day. The cliffs to the west rise up from the waters edge a good 500 feet and for a length of about 3 miles in the section closest to where I sail. These cliffs can make wind direction "interesting" sometimes as the wind is affected by them but the scenery is majestic.
A small boat like the Westport Skiff would make these waters seem vast and full of possibility. I once went for a sail on a friends boat. The boat was over 50 feet long and it sailed pretty fast. We were across the bay in no time, up to the top and then back down again. He complained about the waters here being too small, not enough for his boat. I think that the more useful assessment would be that the boat wasn't really suited to the area. After all, you can influence the size of the boat, but I'd rather that nobody tried to influence the shape and size of this beautiful river.
I have taken my skiff, WHISP, a Jim Michalik QT flat iron skiff, modified with a sailing rig out on the river and have resisted the urge to "stay out" or stretch the length of the sail and the adventure but mostly because I forget or just don't plan ahead and carry a lunch onboard. There is also the concern that I will sail far enough away that getting back to my launching place won't be easily possible. Quite the opposite problem of my friend with the 50 footer. One of the things that lurks in my mind is that landing places for a small boat have been reduced. on these shores that are now mostly privately owned by people who have little connection to the river other than looking at it and the understanding that the proximity increases their property value. If the shore line isn't part of some large house, then it is part of a marina or shore side business that only welcomes those willing to pay. What does that leave for kids wanting a little adventure but being subject to the vagaries of wind and the ever changing tide as well as their own mercurial natures? The long shorelines of the parks along this stretch of the river help in this respect greatly but even those are more regulated each passing year and seemingly just for the sake of control and not so much about logical stewardship of the land. One often wonders for whom the parks are kept. In my own village launching places become the challenge. The two "town" parks that are on the river are fenced off and have access regulated during the season, and off season the gates are locked. It makes one feel as though the town officials look at it's citizens beyond reasonable judgement to take care of themselves or their own parks. This might be so in many cases, but it certainly will be more and more the case if people loose their experience of having to make reasonable decision and the benefit of learning from misadventure. The statistics on the number of people injured by having access to a shore side park are note even worth looking at when one puts them against the numbers of injuries in children who play weekend soccer or baseball, or the automobile accidents that happen each day.
As long as we have access to our waters we can still have the kind of adventure and fun that comes without predetermined rules or limitations of the person or of the mind. A small easily built and maintained boat, like these flat bottomed skiffs are great "magic carpets" that we can explore in, be proud to own and keep. The can lead us on great little adventures on the water and along the river edges all the while helping us to resist the temptation of pointing the bow to sea because of their limitations, but not keeping us from imagining all the while we are bobbing about, what it might be like to venture out down and out upon the ocean.
Sunday, December 28, 2014
Saturday, December 27, 2014
Pizza Box boat design
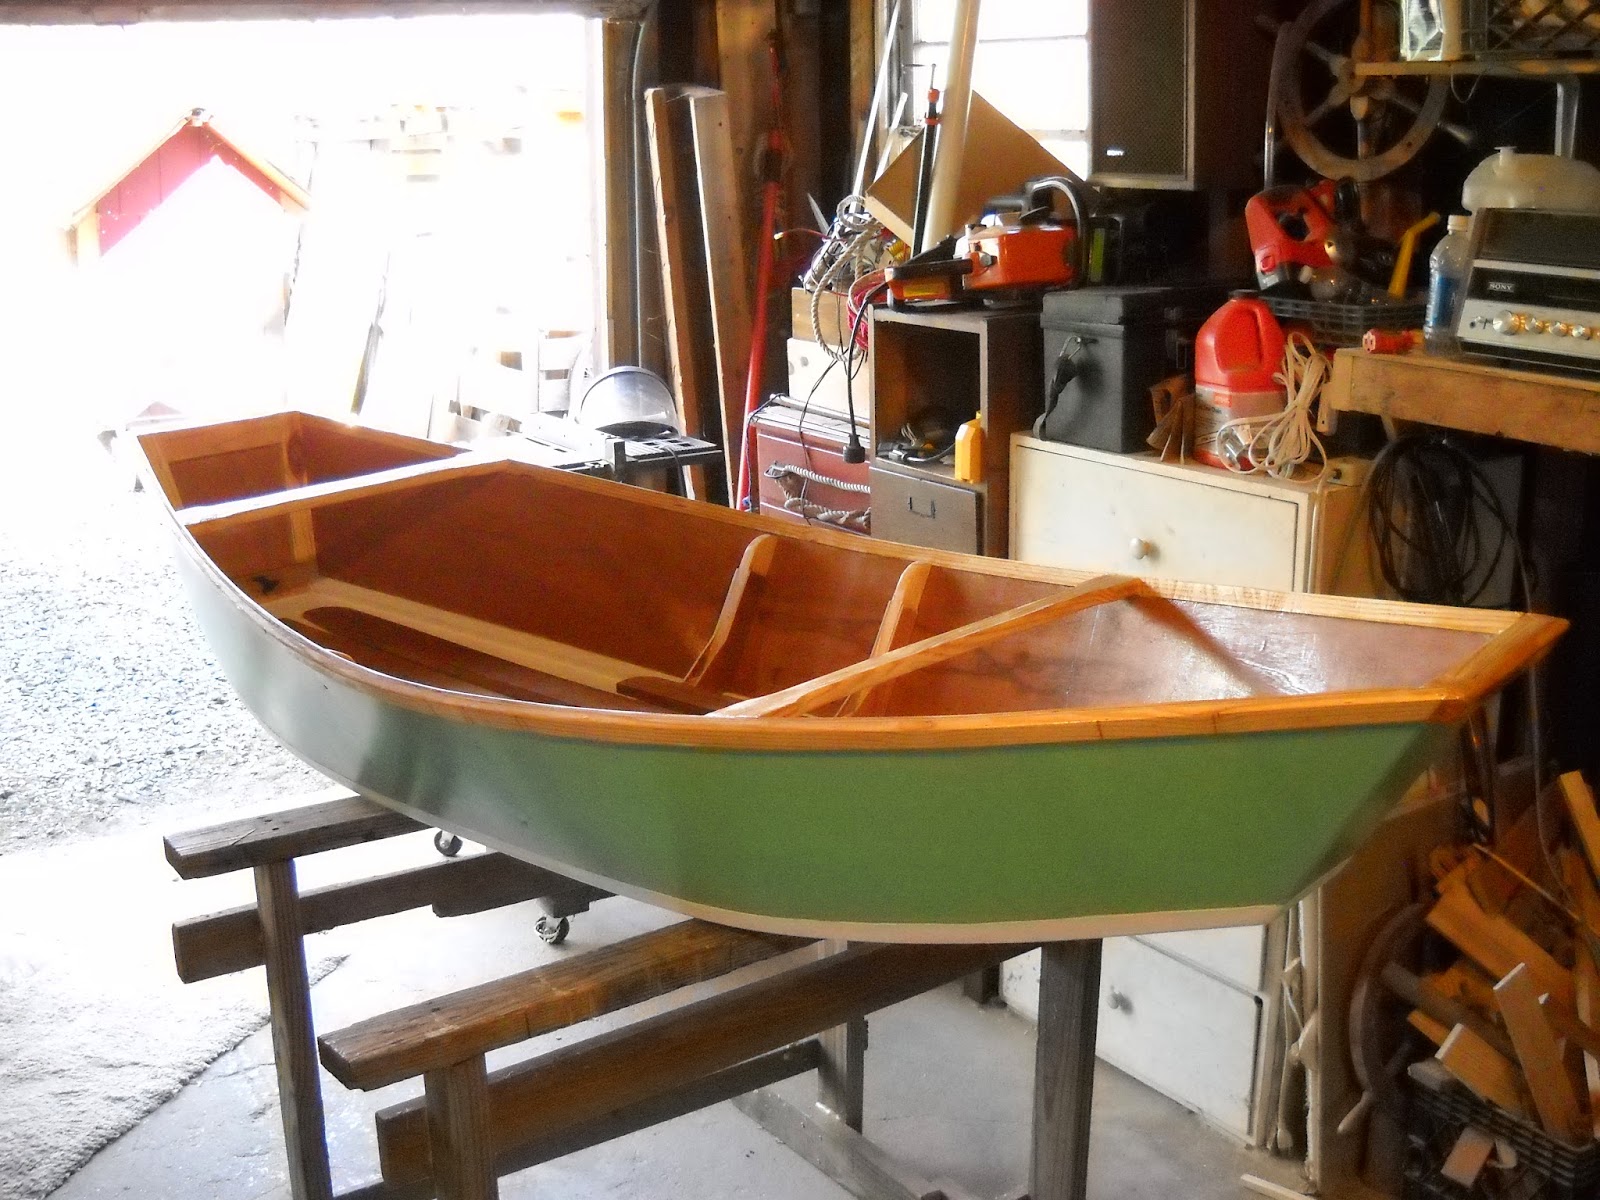
My little brother wants to build a boat in his garage as project to keep him busy. I had considered getting him one of the books on instant boats but in looking thru them I thought it might be better and a bit more fun to just come up with a boat for him on my own.
I like getting the basic boat idea by thinking up dimensions and then building a model from cardboard. Pizza boxes work great for this and I seem to have a good supply of them, about one more each week.
His boat will probably be used for fishing on the local lakes where he lives and need to be transported in the back of his pickup truck. It will be rowed, though I wouldn't put it past him to apply a trawling motor to it at some point.
A simple hard chined skiff seems the best thing for a first time boat builder who is really a fisherman and a construction worker/tradesman, but not a finish carpenter. He has limited tools in his "shop" so I will keep it as simple as possible.
Very simple cuts, butt block scarfs, constant bevel on the chines, the bottom will be cut out last to the shape of the sides.
I don't think it will be a fantastic rower but it will probably have a good capacity and subtle lines. It has a small amount of rocker that is determined by the small amount of flare and the width of the transom against the width of the midsection. Two thwarts and maybe a small deck at the bow.
He'll have to build some oars as well unless he finds a set at a yard sale or something, but I'll include plans for those too.
I am tempted to build it myself just for the fun of it.
I will build a plywood model at the same scale and maybe send it to him.
messing about!
I like getting the basic boat idea by thinking up dimensions and then building a model from cardboard. Pizza boxes work great for this and I seem to have a good supply of them, about one more each week.
His boat will probably be used for fishing on the local lakes where he lives and need to be transported in the back of his pickup truck. It will be rowed, though I wouldn't put it past him to apply a trawling motor to it at some point.
A simple hard chined skiff seems the best thing for a first time boat builder who is really a fisherman and a construction worker/tradesman, but not a finish carpenter. He has limited tools in his "shop" so I will keep it as simple as possible.
 |
| The pizza box skiff! 11-6" LOA, 4' beam, 16" depth amidships, draft about 3" With 3 sheets of 1/4 inch plywood plus solid wood for frames and stem, skeg, skids about 100 pounds I'd guess. |
I don't think it will be a fantastic rower but it will probably have a good capacity and subtle lines. It has a small amount of rocker that is determined by the small amount of flare and the width of the transom against the width of the midsection. Two thwarts and maybe a small deck at the bow.
He'll have to build some oars as well unless he finds a set at a yard sale or something, but I'll include plans for those too.
I am tempted to build it myself just for the fun of it.
I will build a plywood model at the same scale and maybe send it to him.
messing about!
Friday, December 12, 2014
Nav table cabinet
Well today I got the basic cabinet installed, well, put in place or dry fit. I am pretty happy with the result, but for the problem of the stain on the wood not matching the rest. I may end up having to start over with these two pieces, but if I do at least I can use these as templates.
I wasn't planning on putting doors on this cabinet, but I may yet. The doors would affect the clearance of the lifting desk lid to some degree. It is something I don't need to worry about right now.
It is very satisfying to see at least a little progress every few days. We haven't even hit winter yet (9 days til the solstice!) and even so I feel as though so much has gotten done. The interior of the boat feels as if new and has really change the character of the boat down below. It also has made the boat feel more mine, or more of a reflection of me.
 |
| New additions Starboard side. |
Saturday, December 6, 2014
Tut tut, it looks like rain!
Still more gray and wet days. Seems as though I don't remember when I last saw the sun. It hasn't been that long, I am just being a bit dramatic.
I did use the gloomy weather to get some work done in the shop. I got the "hanging knee" fashioned for the cabinetry at the navigation station.
I still need to do the finish work as in sanding and stain and varnish but the varnish won't happen until Springtime. Now that the knees are fitted and thus the dimensions of the upper shelf established and locked in, I can now work on the cabinet itself. The wood is the same reclaimed stuff that I have been making all of the trim in this project from, so I hope that it will tie all of the new accommodations together nicely when finished.
I found some high density foam pieces with a fabric backing on it. It is often sold as "interlocking rubber tiles with a berber covering" and I found that it works wonderfully as a floor cover in the cabin. It is nice to walk upon, and stiff enough to hold it's shape and not bunch up or slip the way a rug might, and it insulates the cold floor amazingly well. I would recommend it to anybody using their vessel in colder weather. It also has a nice clean appearance to it that makes up for it not being wood. Because it is so stiff cutting it to size holds it within the fiberglass pan that the cabin sole sits within. I found mine in somebodies trash but having used it wouldn't really hesitate to have to buy it, and in fact I may purchase some more just to cover other parts of the hull that need insulation, for temperature or sound. It could keep items from chaffing the inside of the hull and it floats.
The cabin has become very cozy and is a nice retreat even while sitting in the boat barn on dry land. I have to take my consolations where I can, especially this time of year.
I did use the gloomy weather to get some work done in the shop. I got the "hanging knee" fashioned for the cabinetry at the navigation station.
 |
| Nav station and first stages of the cabinet/shelf. |
I found some high density foam pieces with a fabric backing on it. It is often sold as "interlocking rubber tiles with a berber covering" and I found that it works wonderfully as a floor cover in the cabin. It is nice to walk upon, and stiff enough to hold it's shape and not bunch up or slip the way a rug might, and it insulates the cold floor amazingly well. I would recommend it to anybody using their vessel in colder weather. It also has a nice clean appearance to it that makes up for it not being wood. Because it is so stiff cutting it to size holds it within the fiberglass pan that the cabin sole sits within. I found mine in somebodies trash but having used it wouldn't really hesitate to have to buy it, and in fact I may purchase some more just to cover other parts of the hull that need insulation, for temperature or sound. It could keep items from chaffing the inside of the hull and it floats.
The cabin has become very cozy and is a nice retreat even while sitting in the boat barn on dry land. I have to take my consolations where I can, especially this time of year.
 |
| The gray floor covering is made from rubber, interlocking tiles with a berber facing. It's warm, soft, good traction, and clean looking. |
Monday, November 17, 2014
Rainy day dreaming
 |
| (I am using this photo without permission it was taken from the internet) Great looking houseboat! |
Harry Bryan designed a SHANTYBOAT that is just about the thing I'd like to build. The size is just about right and the character of the design lovely. It defies the stereo type of a trailer on the water and is keeps it's boat nature in the shape of the hull.
Though this boat in the picture above is lovely it does not give the impression that it would move willingly or in anything but very calm conditions. The SHANTYBOAT that Bryan drew and built looks as though it wants to move, a little bit, and I find that very appealing.
As I make the cabin of my fiberglass cruiser into a warm and inviting home I still can afford to dream about other boats and projects. Dreams are free, mostly.
 |
| (taken from the internet without permission) Harry Bryan's boat on the cover of WoodenBoat Magazine |
Sunday, November 16, 2014
Warm cabin
Today it was work around the property, but when it came time for a break, and afternoon tea, I decided to go to the boat to sit in the cabin and evaluate and admire the work done so far.
The cabin was cold inside, about mid thirties fahrenheit. No sunshine today to heat up the boat barn. So I lit up the oil lamps and drank my hot tea. I looked around at all the different parts coming together and enjoyed the atmosphere in the little cabin. The dark wood, the deep green fabric on the settee, the tartan plaid curtains, the bronze and brass fittings and lamps, the light of the flames in the lamps, all of it coming together to make a space that feels as comfortable as a favorite sweater.
The heat of the lamps got the thermometer moving upward. My eyes focused on the wood stove. I have yet to make the new arrangements for the stove. The new arrangements will drop the stove down lower and closer to the floor where it has always remained cold no matter what the temperature up at the ceiling. The stove arrangement is probably next on the list.
I have not lit the stove since the boat has been in it's barn. There is plenty of air circulation in the barn to allow for use of the stove, or so I suspected. It seemed like a good day to try lighting it and finding out, after all I could just light a small fire and then monitor the air in the barn and if it was fine build it up a bit. After all the lamps had warmed the place up a bit already, what ever the stove could do would only help.
The small fire was fine and though the barn got a tiny bit smoky when I started the fire, it cleared up right away. This boat has a Dickinson solid wood stove. The stove is fine for ornamentation but it is lacking for practical use. The stove top is only 3 inches deep, and that makes it hard to fit a pot or kettle. The fire box is small and the stove is made of stainless steel sheet so it doesn't have much mass, a key feature for a wood stove. Still, I can heat up the cabin a bit and the open front screen/damper gives a view of the flame. Sitting in the cabin with the wood stove burning watching the flame in the fire box or the flames of the lamps made the place really quite wonderful to be in. It is such a small cabin but on a cool or wet day coming down below to the welcoming space makes it all the better for it's size.
I wasn't going to stay long so I let the stove die down. The cabin got warmed up to just above fifty degrees in the time I was there. If I'd had a bigger fire going instead of just the little test fire I had I am sure the room would have gotten quite comfortable.
If I had it to do again, and the cost wasn't a problem I would probably get a SARDINE wood stove from Navigator Stove works. I have a LITTLE COD from them for my kitchen and it is lovely. The SARDINE would be on the large size for my boat, but just, and if I was willing to give up the port settee completely then that stove could be just great.
I will make the DICKINSON stove work and it will be fine, it is fine.
Saturday, November 15, 2014
Table cabinet is done!
Today I installed the cabinet/shelf/table mount.
The cabinet is made from oak shelving that I found discarded. It is on the heavy side but not to a fault, just so that it feels substantial. The back of the cabinet is paneled with the same wood that I milled down and put a bevel on the edges. I don't have the means to make a tongue and groove joint, but the bevel seems to work fine.
The cabinet is attached to the shelf above it with 4 bolts and to the back rest of the settee with 2 screws. It joins all these pieces together and make them stronger.
I will probably make a fiddle that goes half way up the cabinet for those times when sailing rail down. I am still playing with the idea of making some doors to close up the whole space, but it seems a bit much for such a small space.
 |
| New folding table/cabinet. |
The cabinet is attached to the shelf above it with 4 bolts and to the back rest of the settee with 2 screws. It joins all these pieces together and make them stronger.
 |
| The fiddle has to be stained and varnished yet |
 |
| The new cabinet and folding table mount. |
Saturday, November 1, 2014
salon table
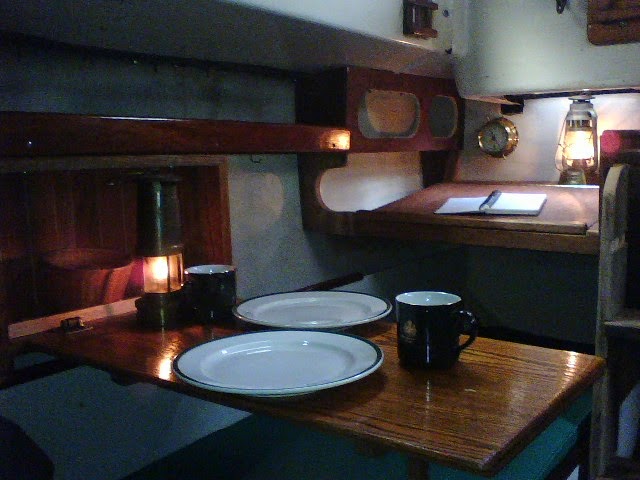
Mocked up the salon table using the old table top. The fit is great!!! I am very happy to be using the same old top that I once used in this boat.
I set up my boat dinnerware just to test out the fit. It is great for such a small space and plenty for cozy dining. I am thinking of making an outboard shelf/mounting surface for the hinges of the table that will have storage for utensils and cups or condiments.....
The table folds up and out of the way for sleeping, or, it can be taken completely away with the quick connect hinges. Sweet!! There is just enough room for sitting and is quite comfortable with the bulk head as the back for one person and the nav-table the back for the other.
The cabin is 6'6" long by 8 feet wide. In it I have no got a Navigation desk, a dining table, a proper galley with sink, stove and storage, a multi-use area/shelf that would be ideal for prep cooking, a wood burning stove, and two full sized sleeping berths that double as settees! Instead of all these accommodations making the space feel smaller it actually makes it seem bigger, as if there are different areas to be in. Weird and wonderful.
Next on the list is getting the wood stove lower in the cabin, about 9 inches lower and only about 4 inches off the cabin sole. This will help a lot in heating the lower area of the boat. If I could put the wood stove in the bilge I would.
The cabin is now a nice place to be and just sit and write or read. Imagine how nice it will be when the boat is in the water!
 |
| The new table position temporarily mounted up. |
The table folds up and out of the way for sleeping, or, it can be taken completely away with the quick connect hinges. Sweet!! There is just enough room for sitting and is quite comfortable with the bulk head as the back for one person and the nav-table the back for the other.
 |
| View from the companionway. This table is just big enough for two. |
Next on the list is getting the wood stove lower in the cabin, about 9 inches lower and only about 4 inches off the cabin sole. This will help a lot in heating the lower area of the boat. If I could put the wood stove in the bilge I would.
The cabin is now a nice place to be and just sit and write or read. Imagine how nice it will be when the boat is in the water!
Interior layout of the Bristol
After being out of the water for a while, five years now, I think, and not being willing to put her back in without having taken advantage of having her right here at home, so close and easy for working on, I have finally got to work on the interior layout of the boat. I have wanted to "adjust" the layout of the cabin since I got her. The design did not include a table for dining, and the icebox that it did include was not used as such, and a waste of space. In my changes to the cockpit and my adding the cargo area, as I call it, I opened up the cabin to the space under the former cockpit and wanted to keep that access thru that was originally blocked by cabinetry and the sink.
Now, the navigation desk has replaced the icebox. The sink is over the port side and the passage under the bridge deck to the cargo area is open and useable. My thought is that a ice cooler can be used for food that needs cooling and for longer trips I can get an electric cooler (12v DC) if I feel the need. This can live under the bridge deck and be moved to where ever is convenient.
Now, the navigation desk has replaced the icebox. The sink is over the port side and the passage under the bridge deck to the cargo area is open and useable. My thought is that a ice cooler can be used for food that needs cooling and for longer trips I can get an electric cooler (12v DC) if I feel the need. This can live under the bridge deck and be moved to where ever is convenient.
 |
| The clamped in place, temporary stairs are a good fit, easy to use. The nav-desk to Starboard, sink and stove to port with berths below each |
 |
| Port berth and galley. The shelf under the bridge deck will serve as a cooking prep area. |
 |
| The nav desk will have shelves outboard of it. |
 |
| The lifting lid for storage underneath of charts and such. |
The space is small down below on such a skinny 27 footer, but it is more than enough and it is also very cozy. I have yet to add in the table, which will go over the starboard settee and fold up and out of the way. I may get to that today.
I am pretty happy with the result. Most of the parts are component and will be disassembled and finished with varnish before being finally fastened in place. Now, I can retreat to the cabin and enjoy some time in a cozy space that is familiar and useful. I may not be on the water right now, but I am still getting to mess about in boats. The boat serves as a great tiny home/studio/retreat, even while on land. The work on the cabinetry has challenged my carpentry skills a bit and made me a little better, I think.
Thursday, October 2, 2014
Presto! the mast is in one piece again.
Here is the repair of the mast with the pop rivets in. I found that the epoxy got thick pretty quickly so I worked fast. I think that with the number of rivets, the epoxy, and the area of the scarf, the mast should be pretty strong.
 |
| Looks like I took a Bedazzler to by mast! |

Ventura mast repair
As I walked across the street to collect up the fire wood I'd been chopping I looked back and caught sight of Ventura sitting there on her trailer. I had put some white primer paint over the fiberglass repairs so the big blotchy scars were not so apparent. I had a flash of the sensation of sailing her and all the kindly attributes I could ascribe her, including my surprise to discover that she was a quick little boat that could move along in the lightest air. I laughed out loud, giggled really. How many things that you own actually make you laugh out loud, or even smile each time you see them. My boats do this for me.
So with renewed energy I set to work on the mast repair.
I had cut and shaped the 2 halves of the 18 inch section of mast that I was using for the scarf repair. Now that they fit inside the mast snuggly I could start the attachment process. I decided on a pattern for the fasteners. Each half of the masts would get a total of 22 rivets, all offset so as not to create weak "perforation in the mast. I drilled out the holes in the mast to the size of the pop rivets, 3/16 inch. I then fit the sleeves inside, as snug as I could get them to the inside of the mast and chose one of the rivet placements for the first self taping sheet metal screw to be placed. I pre drilled the hole, undersize in the sleeve as it was held in place and then drove in the screw. This had the affect of drawing the sleeve in tight to the inside of the mast. This allowed me to then drive in the other fasteners and have the sleeve as tight to the inner wall as possible.
Once I finished attaching both sleeve halves to the bottom section of mast it was time to attach the upper section. Lining up the two pieces as best I could and using length of scrap metal T track set in the sail track to keep it straight and aligned I then continued the process of driving in screws. These screws are temporary, holding the sleeves in place until I put in the permanent pop rivets. Using the screws to pull the inner sleeves tight against the inside of the mast and allowing me to remove them and adjust if needed. The sheet metal screws are a smaller diameter than the pop rivets so that if a hole from a screw needs to be adjusted, the pop rivet will still be able to do it's job.
Even with only a few screws in I stood the mast up and the scarf felt very strong. I am probably going to coat the sleeves with a TiteBond epoxy, that is supposed to work on aluminum before I rivet them in place. I figure that even if the epoxy doesn't bond well, it should work as a bedding between the two surfaces.
Saturday, August 30, 2014
Ice box removal!
This week past I got the icebox removed from the Bristol. It took up a LOT of space and I never, well almost never, used it as an icebox, it mostly stored galley stuffs, plates, food...kind of an inefficient use of the space, and on a small, skinny sail boat, that could be considered criminal.
I had read an account of Daniel Spurr's removal of his icebox from his Pearson Triton, almost the same boat as the Bristol 27 in many ways, and he put fear into me about the project, saying it was difficult and messy. I can only assume that Pearson and Bristol built their boats a bit differently from each other because the job was not to bad at all.
I took my time trying to deconstruct the icebox rather than just taking a cutting tool to it. As I unscrewed the outer plywood structure the attachment points to the hull became apparent. It was basically 4 large wood screws that went thru a bulkhead, easily reachable from the cargo hold(or if you don't have my customized Bristol 27, from the starboard cockpit locker, and making a cut in the fiber glass along the cockpit access hatch (10x12 opening). I also had to cut off the fiberglass drain tube that went thru the bulkhead in order to wiggle the icebox out of position once it was cut free.
Now I have a HUGE amount of space at the foot of the starboard settee/berth. I plan to make a chart table/desk in that place and in doing so increase the foot room for the berth.
Now I get to do what I enjoy doing so much, I get to sit in the cabin and stare and think and imagine and conjure and cogitate over what the new area and accommodations will look like, what they will do to make life aboard better. I have the winter to do the figuring, and the building. I have longer than that if I choose, but knowing that I have the time allows me to take the time to enjoy the designing process. So, sitting in the corner of the port side berth, next to the wood stove, with a cup of coffee and a sketch pad and a dream sounds like a great way to spend some of the coming season, almost as good as if the boat were in a berth, floating, but not quite.
Friday, August 22, 2014
Remodeled galley
The new galley arrangement is pretty much in. At least all the big work is done, the layout decided, the framing cut and installed and the test fitting of the whole thing. I think I will be very happy with this setup.
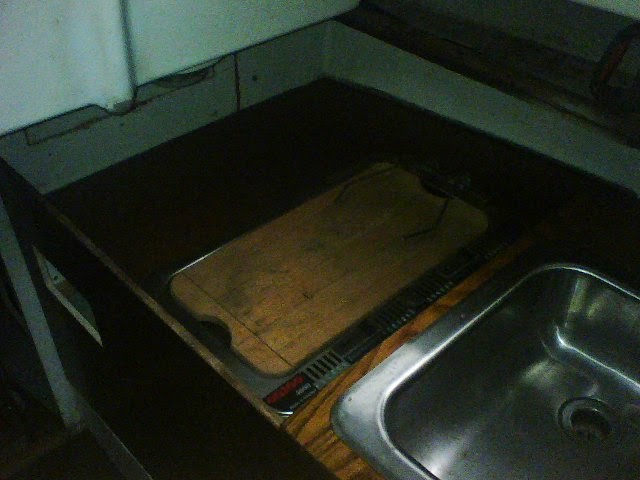
This set up accomplishes two things very well that I've wanted but up until now couldn't figure out how to get it. The first thing is that I wanted a galley that I could really work at. I am 6'1" tall and the boat is perfect for a person about 2 inches shorter than I am, but for me I have to stoop almost constantly. Getting the galley along the port side allows me to stand with my head under the companionway hatch where a few inches of height is gained. The sink is elevated so that it is at a good height for washing up or with a cutting board on top and I don't have to suffer a back ache. With the sink elevated the stove top is in a sort of well about 6 inches deep. This will add security to the cooking when in a seaway or the odd wake comes by.
The other thing that is accomplished with this set up is that the port settee/berth is still quite useable. The sitting space is generous for one person and the berth is still very easy to get in or out of. The raised sink keeps the plumbing from conflicting with habitation of the space.
I have yet to install the fresh water pump as I am reworking it. It is an older style pump, chromed bronze, and quite nice. I plan to install it forward of the sink so that it aligns with the drain and is easily right hand operated.
I am more in the mind of using small containers for water storage these days but this is a simple manual system and the tank is 20 gallons (I think) under the v-berth with access hatches to clean it out. Pretty simple and I don't even have to keep the tank full to make it useful.
All the way aft, under the stove counter top, I have built and added a drawer that is about 15 inches deep, and 8 inches wide. This drawer uses up space that is otherwise wasted and still does not interfere with the feet of the person in the port berth. I hope to make the face of the drawer match the sink counter top, which is made from varnished reclaimed wood. The wood was from a very old table I found in a trash pile. Scraping away the 2 or 3 layers of different color of paint and sanding revealed a nice wood that is blondish with dark grains running thru it. The facings, on the stove counter and the bulkheads are all stained and varnished Luan plywood. I use it because it is cheap and uses exterior grade glue and has a nice red color to it, a type of mahogany I think, or at least it looks that way. Using a stain I have got it to match the existing varnished plywood bulkheads pretty closely.
The stove is a two burner alcohol stove which has served pretty well. The sink could be deeper to my taste but it is what the boat came with and will serve.
It is good not to have to look at all that white/greenish/yellow formica counter top that spoke so strongly of the 1960's, when this boat was built. Though the varnished and stained wood is dark it is rich looking and with the white paint anywhere the varnished wood is not the over all affect will be pleasing, I hope and suspect.
 |
| The sink counter is solid wood, grainy and looks old, but in a good way. |
This set up accomplishes two things very well that I've wanted but up until now couldn't figure out how to get it. The first thing is that I wanted a galley that I could really work at. I am 6'1" tall and the boat is perfect for a person about 2 inches shorter than I am, but for me I have to stoop almost constantly. Getting the galley along the port side allows me to stand with my head under the companionway hatch where a few inches of height is gained. The sink is elevated so that it is at a good height for washing up or with a cutting board on top and I don't have to suffer a back ache. With the sink elevated the stove top is in a sort of well about 6 inches deep. This will add security to the cooking when in a seaway or the odd wake comes by.
 |
| Forward of the sink there is still room to sit comfortably, with feet on the cabin sole or under the sink. The wood stove is just off the right edge of the picture and will make this a cozy place to sit |
I have yet to install the fresh water pump as I am reworking it. It is an older style pump, chromed bronze, and quite nice. I plan to install it forward of the sink so that it aligns with the drain and is easily right hand operated.
I am more in the mind of using small containers for water storage these days but this is a simple manual system and the tank is 20 gallons (I think) under the v-berth with access hatches to clean it out. Pretty simple and I don't even have to keep the tank full to make it useful.
 |
| The drawer is yet to be put in place and the trim is a project for the winter. |
All the way aft, under the stove counter top, I have built and added a drawer that is about 15 inches deep, and 8 inches wide. This drawer uses up space that is otherwise wasted and still does not interfere with the feet of the person in the port berth. I hope to make the face of the drawer match the sink counter top, which is made from varnished reclaimed wood. The wood was from a very old table I found in a trash pile. Scraping away the 2 or 3 layers of different color of paint and sanding revealed a nice wood that is blondish with dark grains running thru it. The facings, on the stove counter and the bulkheads are all stained and varnished Luan plywood. I use it because it is cheap and uses exterior grade glue and has a nice red color to it, a type of mahogany I think, or at least it looks that way. Using a stain I have got it to match the existing varnished plywood bulkheads pretty closely.
 |
| Two burner alcohol stove and original sink. The stove counter is lower than the sink adding a bit of safety for pots that might jump as well as all the galley stuff. |
The stove is a two burner alcohol stove which has served pretty well. The sink could be deeper to my taste but it is what the boat came with and will serve.
It is good not to have to look at all that white/greenish/yellow formica counter top that spoke so strongly of the 1960's, when this boat was built. Though the varnished and stained wood is dark it is rich looking and with the white paint anywhere the varnished wood is not the over all affect will be pleasing, I hope and suspect.
 |
| I have the cruising model but now with the galley along the port side On the dinette model the galley takes up the entire starboard side. I like my compromise better as I keep the port berth |
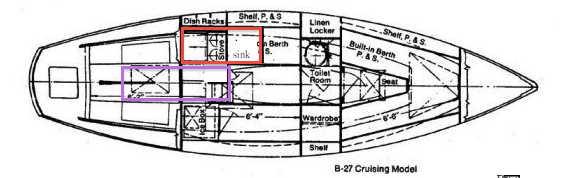 |
| The red area is the new galley The purple area is the "hold" that is open to the cabin and replaced the larger part of the cockpit. |
Thursday, August 21, 2014
The book shelf
While looking at my bookshelf wishing I could reread some of my library, but as if it was the first time, I picked up David Seidman's book, "THE COMPLETE SAILOR", and reread the introduction. I will write it, in excerpts, here for you to see and appreciate. It is a good inspiration to read the rest of the book.
I have no permission to reprint this passage, but do so as tribute to this very worthy piece of writing. (Copyright 1994, 1995 International Marine, an imprint of The McGraw-Hill Companies)
BECOMING A SAILOR
There are more efficient, faster, and economical ways to travel on the water, but non as rewarding as when done under sail. After many decades of being blown about, soaked, awed, teased and satisfied, each time I drop the mooring there is magic. For thirty years it has stayed fresh and new. Like a photographer who still gets a thrill out of seeing an image appear in the developing tray, it never ceases to lighten my soul when I realize that through cunning and skill I have tricked the wind into moving my boat. There is nothing like it......Anyone can learn to sail. That's easy enough........But there is more to sailing than...well, just sailing. By its very nature sailing is slightly enigmatic and requires abstract thought. You can't just press a button and go where and whenever you like. it takes effort. Which in turn necessitates a certain amount of involvement. And this involvement is what being a sailor is all about.................A sailor is one who can handle a vessel of almost any type quietly and competently. He, or she, can read the water, the current, the waves, the clouds, and even the smells. The sailor, like any good craftsman, is at home with the tools of his trade and the elements he works in. Becoming a sailor takes time (more than a weekend, I can promise), and it takes work. But the time will pass all too swiftly, and the work will seem like pleasure.
I read this book early just after it came out and really enjoyed not only the writing but also the many drawings and sketches. Somehow it seemed to be a great and practical summary of much of the other information I had gained by reading the many other books on the subject of "how to sail." If your looking for a good refresher on sailing or to introduce somebody to the craft, I recommend this book.
Wednesday, August 13, 2014
cabinet maker?
For the past two days I have been enjoying working on Waneeshee's galley arrangement. My Bristol 27 came with the standard cruising model set up, the galley under the companionway athwart ship with the icebox to starboard, sink, and then stove to port. Since I opened up the passage going aft so as to access all the storage space under the cockpit I have not settled on a new galley arrangement that made me happy, but I think I have found a set up that will.
I have taken the sink and move it forward of the stove on the port side. This arrangement will leave the port side berth available, but the settee will no be only capable for seating one person between the sink and the wood stove.
The sink is elevated so as to keep the plumbing from blocking the berth and also to make the sink a comfortable working height when standing. Because of the elevated sink counter, the stove area is now in a well of sorts and this will add to the security of the pots and pans and such. With this arrangement I can actually stand up and cook, which is much more natural for me than sitting.
Building the new sink counter was a new step for me in two ways. Firstly, I am not using any power tools for the job. I have been inspired by the many fine carpenters I have read of, and seen on videos on Youtube. I am no where near the skills that these men posses but I can only get there by trying. The joy of not hearing the whine of power tools is great for me and the extra time needed for each cut, for each hole drilled, and for every measurement taken is helping me to be more precise and patient.
So far this counter/cabinet is probably the tightest, strongest joinery I have every done. No glue, yet, just screws and even so it is all solid. I will use some glue after I have got all of the assembly worked out, then I will unscrew it all and glue it up and refasten it.
So far, all the materials are reclaimed. I'd like to keep it that way, but I may have to buy a piece of plywood for the facing.
It is very good to be building again, and more so because it is the Bristol that I am working on.
Monday, August 11, 2014
Waneeshee
She was once as much a part of me as any thing can be or has been in my life. I think that if I'd known that she would be out of the water for as long as she has been I would have, instead of hiring a truck to haul her home, dropped the mooring lines and ran away with her.
 |
| She seems a distant memory, but in truth, she sits only fifty feet from me, dehydrated and dusty spiderwebs for rigging. |
Video from April 5th recovered
I took the skiff out last week for another sail, this time on my own. The wind was a bit flukey but I was able to tack back and forth across the lake a few times before I decided to stow the rig and just float around for a spell. I think I am leaning toward just using the skiff for a rowing vessel. It makes it all much simpler and I don't really enjoy dinghy style sailing all that much anyway. Along with this I think that I will concentrate on getting the boats that are sailing vessels in order so that I can get out on them.
Rowing the skiff is quite enjoyable and not having the added weight of the mast and sail rig would make the launching process all the easier.
Monday, August 4, 2014
Sailing the new rig
We took the new rig out on Friday and it all seems to be working as expected. The smaller sail and sprit are much easier to handle and seem more appropriate for the boat. The rudder tends to float to one side or the other if left to it's own, but I figured that would be the case. Having a rudder does make the whole affair a little more complicated but when out for longer sails will be nice. The fore and aft tiller stick works just fine.
Thursday, July 31, 2014
New Mainsail and sprit
No photo editing, it's done and smaller. Now the sprit and mast fit in the bottom of the boat, but with one hatch open.
 |
| The new reduced rig! |
epoxy and fiberglass
Yesterday I did the fiberglass work on the Venture. Working with this stuff is so distasteful that I seriously considered not doing, stripping the hull and taking the boat to be scrapped, then building a wooden boat replacement. In the end I couldn't deal with the idea of being so wasteful and started mixing up epoxy resin.
I had ground down the holes in the deck so that I could layer in the fiberglass patches already. So I taped up the wholes from inside the cabin to create a bottom and wet out the hole with epoxy for bonding then added a layer with fairing compound so I could shape it from the underside should I go that far, but I seriously doubt I will. Then came layer upon layer of chopped strand and mat fiberglass. After that had gotten somewhat solid but still green, I put a layer of epoxy thickened with fairing compound so that I could create a smooth sanded surface.
I was lucky that the day was cool and a slight breeze kept the smells from just saturating me. Checking this morning it all looks pretty good. At the mast step I added extra layers of glass for strength.
I may start sanding later today.
I am very much considering cutting down the mast height a bit. I don't race and want a boat that will be easy to use. I think the mast was about 24 feet long and a 21 or even 20 foot mast would be that much easier to rig at launchings. The reduced sail area would be a bit but I am not to overly concerned. I still have to scarf the mast back together so nows the time to make these choices.
Friday, July 25, 2014
Skiff work
Today I cut down the sprit yard, got the mainsail set up for stitching, and installed a "keeper" for the rudder, to keep it from floating out of it's gudgeons. I made the rudder lock, I guess I could call it, out of some yellow pine and a bronze screw. It is a teardrop shape and hangs from the transom just above the upper pintle. It can be swung out of the way so that the rudder can be placed or removed but hangs in a way to keep it in place the rest of the time. Simple. I may start stitching up the sail tonight, shouldn't take long to do the seam but the patches and attachment points still have to be worked out.
IT has begun
Yesterday I started the repair of the Venture 21 by taking the old winch rig for the centerboard off and sizing up the new replacement one. I also bailed out all of the water that had leaked in over the past couple of months during the heavy rain storms, about 10 gallons. I have been leaving the hatches open to dry it all out.
I also took off the starboard forward lifeline stanchion and straightened it out, almost to what it was. It is plenty good enough. I took off the remaining wire life line in preparation for replacing those lines with rope. In my thinking rope is plenty strong enough and it has more elasticity. Stanchions are know to rip out or bend and at least leak after being worked by force on the lines. On my larger boat the lifelines are rope and have served just fine.
Today I got the grinder out and ground down the spots on the deck that will need to be repaired with fiberglass and epoxy patches. The four points where the bow pulpit was and the mast step. I intend to use just fiberglass to repair even where it was cored with plywood. I like my repairs to be stronger than original if possible.
Getting all the gear together and protection for myself I was reminded of how much I hate working with fiberglass. This alone is enough of a reason to get rid of my glass boats and make the fleet all wood. Upon starting in with the grinder I was immediately taken back to the days when I remodeled my Bristol by cutting out the cockpit and making a flush deck, by the smell of melting/grinding gel coat and polyester resin. It isn't a totally unpleasant smell in that it has connotations of really great times doing fun and crazy things with boats back when I first started boating. It is really the dust that goes everywhere and is always itchy later on. I have found the best way to get if off is to shower in COLD water with shampoo to float all of the dust off. The cold water keeps your pores from opening up and letting the dust get deeper in to your skin.
It is good to see these great big holes in the deck right now because I know that they mean progress. In truth I'd much rather just scrap this boat and build a wooden replacement for it, but I hate just throwing things out when they can be made useful. Nobody nibbled at the Craig's list add for the boat, so I guess that I am stuck with it for now.
I am thinking of it as the "Frankenstein" boat. I will patch it, and get it back on the water with whatever can be had for free or really cheap. I intend not to do anything about the accommodations below. The boat is just to get me on the water as cheaply and easily as possible for daysails. If I stick to this line of thought I might just get back on the water for Fall sailing.
Friday, July 18, 2014
Pram on the lake
I took the pram out this evening. Both when launching and returning I got stopped by people asking about the little boat and saying nice things about her.

Tuesday, July 15, 2014
putting the mast on a diet
I spent a good portion of yesterday with a spokeshave and the mast. It is a slow process to shape, or in this case, reduce the shape of the mast with just a spokeshave and my eye, turning the mast constantly to check to see it stays round, but not at all unpleasant work. I have to be aware of what music is playing on the shop radio as my strokes of the tool tend to sync up to the tempo of the music. This can be a real advantage at times, but risky at others. A pile of shavings on the shop floor tell me I did skinny up the stick a bit. Those shavings will make good bedding for the chicken coop and I won't have so much weight aloft.
Friday, July 11, 2014
Rudder mounted on skiff!
Today I got the pintles on the rudder and got the rudder mounted on the skiff. I am using a push~pull stick rather than a tiller. This makes more sense for a small boat.
I got this idea from Ian Oughtred's Caldonia Yawl. I have seen other vessels use it too. The stick allows movement fore and aft to balance the boat, and keeps one from having to duck under the tiller or lift it over your head.
 The "arm" is slotted thru a square hole and a peg keeps it in place. I used a chisel to cut the square hole in the tiller. I may change out the peg for a wedge. A piece of line attaches the arm to the stick and serves as a universal joint. Simple, cheap, affective, and it even looks kind of right. I fashioned the gudgeons out of scrap stainless steel plate, but I bought the pintles. The pintles are set in a dado. I hope to paint the bottom of the rudder white, put a red stripe above the water line and varnish the upper section and the steering arm and stick. I also need to put a "keeper" or lock on the top of the pintle to keep the rudder from floating up. I have seen simple metal tabs that pivot on a screw but I might consider a piece of shock cord, in case of grounding so as not to rip apart any of the wood or fasteners. I will probably build a longer push-pull stick later. This one is about 5 feet long and a 7'-6" one would fit stored in the cockpit and might allow for steering while working at the mast.
I got to use my egg beater drill and my brace to drill the holes. I haven't been using the brace as I have not bits for it, but the set of Milwaukee drill bits I have are 3 or 4 sided so they lock in the chuck on the brace. It was very nice and quite and more controllable than the screw gun or electric drill.
I am not sure how well the cedar will due for a rudder. It is light weight and that is why I am using it, as well as it's being able to handle the moisture. I will have to watch the stress points, at the pintles and at the steering arm.
 |
| tiller is cedar and the push pull stick is yellow pine |
I got to use my egg beater drill and my brace to drill the holes. I haven't been using the brace as I have not bits for it, but the set of Milwaukee drill bits I have are 3 or 4 sided so they lock in the chuck on the brace. It was very nice and quite and more controllable than the screw gun or electric drill.
I am not sure how well the cedar will due for a rudder. It is light weight and that is why I am using it, as well as it's being able to handle the moisture. I will have to watch the stress points, at the pintles and at the steering arm.
Monday, June 30, 2014
WB show at Mystic
I had a great time at the Wooden Boat show in Mystic CT yesterday. The small craft collection is just beyond amazing. The weather was glorious, the people were friendly and the boats, they were magical.

Monday, June 16, 2014
WoodenBoat & Launchings!

I got a package in the mail from Wooden Boat Magazine. In the package was a very nice letter, a copy of issue #239, July/August 2014, a decal that says "Proud Wooden Boat Builder", and a cap with the Wooden boat Launchings Logo and the issue # embroidered on it. The letter stated that my pram was included in this issue of the magazine. And so it was when I looked inside.
WoodenBoat Magazine | WoodenBoat, Small Boats, MotorBoats, Getting Started in Boats, and Professional BoatBuilder
I didn't set out to be recognized in anyway when I started building these boats, but the admiration they have received when I launch them at the lake or river and from a few comments on this blog has been appreciated. It is true that I offered up the pictures and descriptions of the boats, so that they might be noticed, but it was only after I had completed them and been presently surprised by the result and impressed by how easy and inexpensive, and enjoyable the boat building and designing process was, that I thought to share that discovery with others, and see if others saw what I appreciated in these boats.
 |
| The Sam Pram, Tartlet |
It is fun for me to see the boat in a magazine. It is still fun and amazing to me each time I put her in the water and climb in, and she floats, and rows, and takes me away from shore to be in that place where men often go, where we are not exactly welcomed, but not turned away, somewhere between beneath the surface, where we can't breath, and below the sky, where we can't fly. Neither place is really ours to inhabit for very long, but in a boat we can dance between them and for long periods of time. Even the slightest little boat, such as this pram, is a "magic carpet" that can take us, under our own power, to that place between and a part of sea and sky.
Saturday, May 24, 2014
New rig ideas
I love modern technology sometimes. I was playing around with the photo of the rig on the skiff and made a quick visualization of what a reduce rig might look like. So maybe a gaff head, or maybe just a reduced sprit, I don't know yet. I am kind of leaning toward a gaff, but probably only because I haven't tried one yet.
 |
| Old rig |
 |
| Possible new reduced rig |
Thursday, May 22, 2014
paddling the lake
I built a rack for the car the day before yesterday, in order to carry 2 kayaks at once. I had some scrap pieces of steel pipe that worked just fine. I cut them to length and painted them black then attached them to the cargo rack. Yakima or Thule would have charged me a lot to sell me something that would look just the same, but in the end, do little better.
A month or so ago I picked up some pool noodles, those foam floating things that someone had thrown in their garbage bins. Those, split down the middle and cut to length made good and colorful pads for the boats to rest on.
We went out and paddled the perimeter of the lake. As we started out the water's surface was glassy, a reflection of the trees on the waters edge and the sky. We seemed to be stalking a Heron, or so he or she might have thought as we would come up on it, it would fly down the waters edge around a corner into the next cove, and then we'd come up on it again.
We stopped for snacks, pulling up to a fallen tree in the water that was also a resting spot for a turtle who didn't seem to mind our company. A woodpecker, with his bright red head didn't seem to mind us either as he took to the stump of the tree we were resting on.
The breeze came up eventually but not so much as to make the paddling difficult. I generally prefer rowing to paddling but this was a good day to enjoy the effortlessness, the quiet, the proximity to the water that a kayak can offer.
Tuesday, May 20, 2014
A skiff in the wind
Went out to the lake today with the skiff. My wife was in her kayak. Beautiful day. I took the sailing rig out but didn't step the mast. The wind this time of year is flukey, gusty and it can go to almost calm to a good 10-12 knots in just a moment. The nice thing is that you can read the wind on the water, no tides to worry about, so you can see the wind coming 10 seconds, or more, before it reaches you.
I found an island to shelter behind and stepped the mast. This was the first time sailing since the "Very Bad day sailing" when the venture was knocked down. I did feel a bit tenuous, but I realize that it is not so much more than I was before that VBDS (very bad day sailing). I learned to sail on full keeled boats, not dinghy sailors. My first boat was a Cape Dory Typhoon. Though only 19 feet long, it had a full keep and was a displacement hull, a little ship. This was my formative time and very different from those who grow up spending summers sailing Optimists and Lasers and such. I prefer a boat with the stability of a ballasted keel, I just do.
Maybe in the middle of summer, when the water is warmer and the air hot and when a dunk in the water would be welcomed, maybe then I will try this sailing rig again, but for now, I think I will stick to rowing the skiff. I am continuing work on the Bristol and my goal is to be sailing her again. I will also fix the Venture but I think only to sell her to someone who she might fit better than me.
It was a great day out on the water and after a few tacks and a few gusts that had me scandalizing the sail in order to de-power the boat, I decided to make my way back to the ramp and stow the sailing rig. Going back out with out the rig to create windage or upset the balance of the boat reminded me of how nice a little boat she is.
We found a cove behind an island and I dropped the hook, my wife rafted up and we shared a nice lunch snack in the sun. It was, is, good to be just messin' about.
Friday, May 16, 2014
Waneeshee
Worked on the Bristol 27 today, actually worked rather than sitting below and staring and thinking. I spent some time removing the original formica laminate from the various surfaces in the galley. Using an old chisel I was able to get under an edge and slowly work my way around. I was able to peal off each piece whole, which is great because I can use them as templates for the replacement coverings.
I hope to do a varnished wood finish on all surfaces, with some tile in the galley so that there is a surface to set hot things on. The stove is on one level, aft of the sink, which is set 5 inches higher. This will make a well where the stove is and insure against pots flying out on a roll. The height of the sink and it's plumbing also allows for the berth below to remain functional.
The vertical white bulkhead in the picture only goes up to the sink but will go all the way forward, with a cut our to make getting in and out of the berth easier, and be varnished wood. Out board of the sink and stove and aft of the stove will be storage space for utensils and galley equipment.
I sat and sketched some ideas for my eating table. I also came up with a possible nav station position for the table top. I could make a separate nav station but that seems a bit much in such a small space.
It was quite wonderful to be working on her again. It has been a while since I did any real work on her, but the spring season has me excited to be at it again.
 |
| New galley arrangement mock up the cutting board on top of the stove is to the left of the sink and down five inches |
The vertical white bulkhead in the picture only goes up to the sink but will go all the way forward, with a cut our to make getting in and out of the berth easier, and be varnished wood. Out board of the sink and stove and aft of the stove will be storage space for utensils and galley equipment.
I sat and sketched some ideas for my eating table. I also came up with a possible nav station position for the table top. I could make a separate nav station but that seems a bit much in such a small space.
It was quite wonderful to be working on her again. It has been a while since I did any real work on her, but the spring season has me excited to be at it again.
Wednesday, May 14, 2014
Sister kayaks
I built a couple of kayak racks onto the boat shed today. We added a boat to the family. The purple kayak is actually a sister to the yellow one. After many years they are reunited.
My friend, from whom I bought the yellow boat many years ago, just gave us the purple one as he no longer needs it or needs to pay to keep it stored. These fiberglass boats are a mid range recreational model, hard chined and about 17 feet long.
 |
| New kayak in the family. |
Monday, May 12, 2014
Mother's day on the water
Went out to the lake for a row/sail on Mother's day. I decided that if I am going to be celebrating all of the Mother's that I know and care about Mother Earth should be in the list too.
Got to the lake and it was blowing white caps into the launch ramp again so we left the sailing rig on land and rowed out to the lee of an Island and enjoyed the sun, a cup of coffee and each other. The pine trees on the island were the special treat filling the nose with the scent of pine and the ears with the swishing sound that they make in the breeze. It's against the law to land on these islands but anchoring in the little bites or bays of them is fine and that is what we did. It is almost preferable to stay aboard and just spread out in the bottom of the boat. The waves bob us around and the sun heats our bones. The dog would prefer to explore the island, and chase some of the geese that roam there, but eventually she settles down and lies with us in the boat.
I think that I still have a few residual affects from the April sail lingering around in my head. While rowing out in the skiff the wind would gust up and push on the topsides and our bodies, enough so as to heel the boat slightly. It made me aware of it, and reminded me how much I prefer full displacement boats with all that ballast below the water line to keep the top of the mast above water, and the keel under the water. We had a 17 foot daysailer for a while and I was always concerned about getting it knocked down. I guess this says more about the kind of weather I've tended to go out in. Since I learned to sail and have mostly sailed on ballasted boats I suppose my sensitivities to wind strengths are more appropriate to them. I should think it would not be a bad thing to learn to be more conservative, as would be appropriate with a light weight boat, in my judgement of wind strength.
I have gotten a few inquiries about the Venture. I do think it would make a good project boat for somebody willing to put in the work.
Got to the lake and it was blowing white caps into the launch ramp again so we left the sailing rig on land and rowed out to the lee of an Island and enjoyed the sun, a cup of coffee and each other. The pine trees on the island were the special treat filling the nose with the scent of pine and the ears with the swishing sound that they make in the breeze. It's against the law to land on these islands but anchoring in the little bites or bays of them is fine and that is what we did. It is almost preferable to stay aboard and just spread out in the bottom of the boat. The waves bob us around and the sun heats our bones. The dog would prefer to explore the island, and chase some of the geese that roam there, but eventually she settles down and lies with us in the boat.
I think that I still have a few residual affects from the April sail lingering around in my head. While rowing out in the skiff the wind would gust up and push on the topsides and our bodies, enough so as to heel the boat slightly. It made me aware of it, and reminded me how much I prefer full displacement boats with all that ballast below the water line to keep the top of the mast above water, and the keel under the water. We had a 17 foot daysailer for a while and I was always concerned about getting it knocked down. I guess this says more about the kind of weather I've tended to go out in. Since I learned to sail and have mostly sailed on ballasted boats I suppose my sensitivities to wind strengths are more appropriate to them. I should think it would not be a bad thing to learn to be more conservative, as would be appropriate with a light weight boat, in my judgement of wind strength.
 |
| on the lake |
Friday, May 9, 2014
Movin on, maybe
I posted to the Venture on Craig's list today. Maybe somebody will need a good, cheap project boat. I will go ahead and start the repairs anyway.
http://hudsonvalley.craigslist.org/boa/4461896475.html
Seems like a Reasonable thing to do.

http://hudsonvalley.craigslist.org/boa/4461896475.html
Seems like a Reasonable thing to do.
Sunday, April 27, 2014

Thursday, April 24, 2014
Rudder
Today after trying out patterns made from pizza boxes I gut up the glued up cedar. I then started to shape it by running the router around the underwater part and then planing, sanding, and rasping the edges.

I will need to do a lot more sanding and shaping but what I have so far seems pretty good.
 |
| trying it on for size. |
I clamped it on to see how it looks. It is OK. I would have preferred that the forward bottom corner had a smaller radius for looks, but I chose to go bigger in case we ground out on something the softer curve might make it all go smoother. I still haven't decided how low the rudder will hang. I do want it to hang below the keel to get a better bight in the water, but I am worried about it not being protected and about the difficulties of landing the boat with that thing hanging the extra few inches.
Tuesday, April 22, 2014
Rudder design
a rudder like this might be nice!
 |
| rudder for an Aber which is a Francois Vivier design |
Skiffing again!
Working on a project for the skiff. I'd like to add a rudder to her, so, I tried out this one that I made for a fiberglass dinghy. just to see what it looked like.
It seems pretty close to being about the right size so I decided to glue up some cedar decking on edge to get the width I want. I will add some horizontal "straps" to help the glue hold the rudder together.
I'll have to work on the actual shape of the rudder and I may need to weight it to counter the buoyancy of the cedar. I am thinking that instead of a typical tiller I will use a fore and aft steering stick so as to make it all less cumbersome.
I am sticking with the Gorilla Glue for the adhesive and the cedar decking is already in use on the boat. I may offset the cedar with yellow pine cheek blocks, or the luan plywood, but I haven't decided yet. I'd like the cedar to be varnished.
It was extremely pleasant to be working on this boat again and to be in the shop again. I hope to get the boat out for a row soon, maybe tomorrow. After the winter dealing only with the Venture I had forgotten how fond I am of these boats that I made with my own hands. Makes me kind of wonder why I ever bothered to get another fiberglass boat.
Speaking of the Venture, I found some scrap aluminum in the shop today, some plate, some tube. I think that it might be usable as the joint for the mast so that I don't have to cut down the mast anymore. If this works out then I will have only lost a foot of mast height, which may mean that I won't have to recut any of the sails.
 |
| rudder from another boat just for size. |
 |
| reclaimed cedar decking being glued up for a rudder. |
I am sticking with the Gorilla Glue for the adhesive and the cedar decking is already in use on the boat. I may offset the cedar with yellow pine cheek blocks, or the luan plywood, but I haven't decided yet. I'd like the cedar to be varnished.
It was extremely pleasant to be working on this boat again and to be in the shop again. I hope to get the boat out for a row soon, maybe tomorrow. After the winter dealing only with the Venture I had forgotten how fond I am of these boats that I made with my own hands. Makes me kind of wonder why I ever bothered to get another fiberglass boat.
Speaking of the Venture, I found some scrap aluminum in the shop today, some plate, some tube. I think that it might be usable as the joint for the mast so that I don't have to cut down the mast anymore. If this works out then I will have only lost a foot of mast height, which may mean that I won't have to recut any of the sails.
Subscribe to:
Posts (Atom)