Pages

Wednesday, December 28, 2011

Flipped!

Once the chines got set, a few days after glueing, I flipped the boat over to make attaching the gunwales a bit easier.  The boat seems so very light.


The gunwales are built in 2 layers, an inner and outer lamination.  The inner has a bevel to make it basically flat, or parallel to the ground/water.  The outer brings it out and adds dimension.

I fastened on the inner gunwale to the hull and let that sit for a day to get used to the shape.  Now I have clamped on the outer gunwale lamination so as to let it take it's shape for a few days.  I am thinking that I will glue up the outer gunwale to the inner, in the proper shape and then attach the laminated piece to the hull.  This will keep me from having to drive screws into the lamination.


Now that the boat is flipped over I have my first chance to see the lines.  The rocker toward the after section of the boat seems pretty severe, but that is where I made the mistake in measurements when cutting the side panels.  The additional 3/4" wouldn't make that much difference, so I am either sensitive to my mistake, or the boat has a lot of rocker aft.

I think adding the skeg as I intend to do is going to require a good bit of wood, an internal keel board/log to attach to on the centerline.
There is still a little movement in the stern section of the boat that I hope will go away when the bottom is attached and the deck and deck beams will are added.  The rest of the boat seems to be getting very strong structurally.

Saturday, December 24, 2011

Chines glued up!

Got the chines glued into place and am letting them set for a while.  I will need to go back and replace the iron screws with bronze or galvanized nails at some point, but next it's on to the gunwales.

Reading John Leathers book "Sail and Oars".  Very encouraging and interesting histories of small, human or wind powered boats, and their creators and users.  Great winter daydreaming.

Wednesday, December 14, 2011

Dry fit of the chines

So, after being away from the project for a few days to work on the car, The chines that had been clamped and jigged in place are now screwed onto the side panels.
Chines with out clamps!
I drilled for a screw at the point where the chine and the stem meet up.  I used one 1-3/4" bronze screw, counter sunk into the chine.  Of course I didn't countersink the first hole enough and split the chine.  A proper job would be to cut off and start over, but since I don't have enough of the chine stock I just drilled out the whole for the screw and clamped the split and will glue, glue glue when the chine gets glued.  The other side went fine.  I have left a clamp setup on the bow while I wait a bit longer for the chine to learn it's new shape before I do the glue up.
jig for stem at chine.
From this point I decided to go ahead and screw in the rest of the length of the chines.  I did so putting a sheet rock screw in every six inches, working from bow to stern and using the long lever of the chine to position the chine for the next set screw.
I found that when I got the the stern, the chine had just about found it's new shape.  It was shy of where it wanted to be about 1/4 of and inch.  I got a pale of hot water and a rag and wrapped the chine in the rag.  After a while I started moving the chine into shape and eventually got it screwed down.
I clamped the chine to so that all the stress of the sprung wood wouldn't rest solely on the fasteners.  I also continued to soak the chine with warm water while I worked the other chine into place.  The starboard chine seemed more willing to make it's shape.  Even so I rigged up clamps and lines to hold the chines in place and got them good and wet while I wait a time before I take them off to glue up the whole thing.
It was rather pleasing to see the length of the boat mostly free of clamps.  I am starting to get a better sense of the lines that the boat will have.

Saturday, December 10, 2011

Thursday, December 8, 2011

While the glue cures

Transom got glued onto the side panels today.  It is cold out so the plastic tarp and oil heater are helping out.
While the curing was taking place I decided to plane the chines forward of station 4, as per instructions.
block plane & square to work chines into shape
The starboard chine was much more in need of shaping than the port????  I used a straight edge to site across the bottom of the sides and the chines and planed until I got a good landing for the bottom.

the bevel for the stem checks out to be 30 degrees, as drawn
but seems to large an angle for the chines to make.
In sizing up the chines to the bow stem it sure seems that the angle of the stem is a touch to wide.  The stem matches the plans so I am hoping that if I attach the chines beginning at the stem and then use the length as a lever I can make it go.  Still, I might just steam the chines before I start at the bow.  I figure I could wrap towels soaked in boiling water around the ends for a while and then start the process of attaching them.  I know I will be doing this for the stern section of the chines.

spanish windlass to convince the chines of where
I'd like them to be.
I put some clamps on the end of the chines (they are cut long) and poured some cold water on them to soften them a little and then use a spanish windlass to pull them in a bit while the boat sits overnight.  The photo is dark because as I was working the power went out again.  It has been very windy the past 12 hours or so.  Don't need much power when working on a small boat like this and using mostly hand tools.  A bit of light could help though.

Wednesday, December 7, 2011

Learning to adapt


In order to do two things I had to make some changes to the transom.  First I had to deal with the mistake I made in measuring the side panels 7/8" to small.  The second thing was to put some camber into the deck that I want to add to the after part of the boat as I had noticed in a the picture I saw of a QT skiff that had been modified for sail.
This skiff seems to have a slight camber to the aft deck!
I took the new angle off the top of the transom where it was not taller than the side and then took the transom back off the boat.
I then took a batten and drew a fair curve from the highest point of the transom, on it's center line and then out to the marked new edge where it needed to be reduced to meet up with the side.
Then I drew a line on the inside face of the transom frame that would make the new angle where the deck would meet the side and the transom.
Then I worked the transom down to the new shape using two different methods for the sake of learning and practice.
 working new shape for transom
The first method I used was to cut down to the line with a lot of small saw cuts.  Then chip out the cuts and, or, cut horizontally each little chip with the saw, starting from the outer edge.
The second method, and the better one to use was to just plan down the new shape, first with a jack plane then a smaller block plane, and around the few knots using the sureform and a saw.

In the end the planed side came out much nicer and the sawed side was kind of rough as some of the chips went a bit to deep beyond the new line.
Over all it was a good bit of learning.
I also cut a false stem to improve the blunt bow, in my opinion.

I found these on the web the other day.  Very nice looking boat!
A bit long for me, but.....It had two swinging keels, one under each sail.

I think it was called "Egret" and don't know
if that is the name of the boat or design.

Monday, December 5, 2011

repair, already?

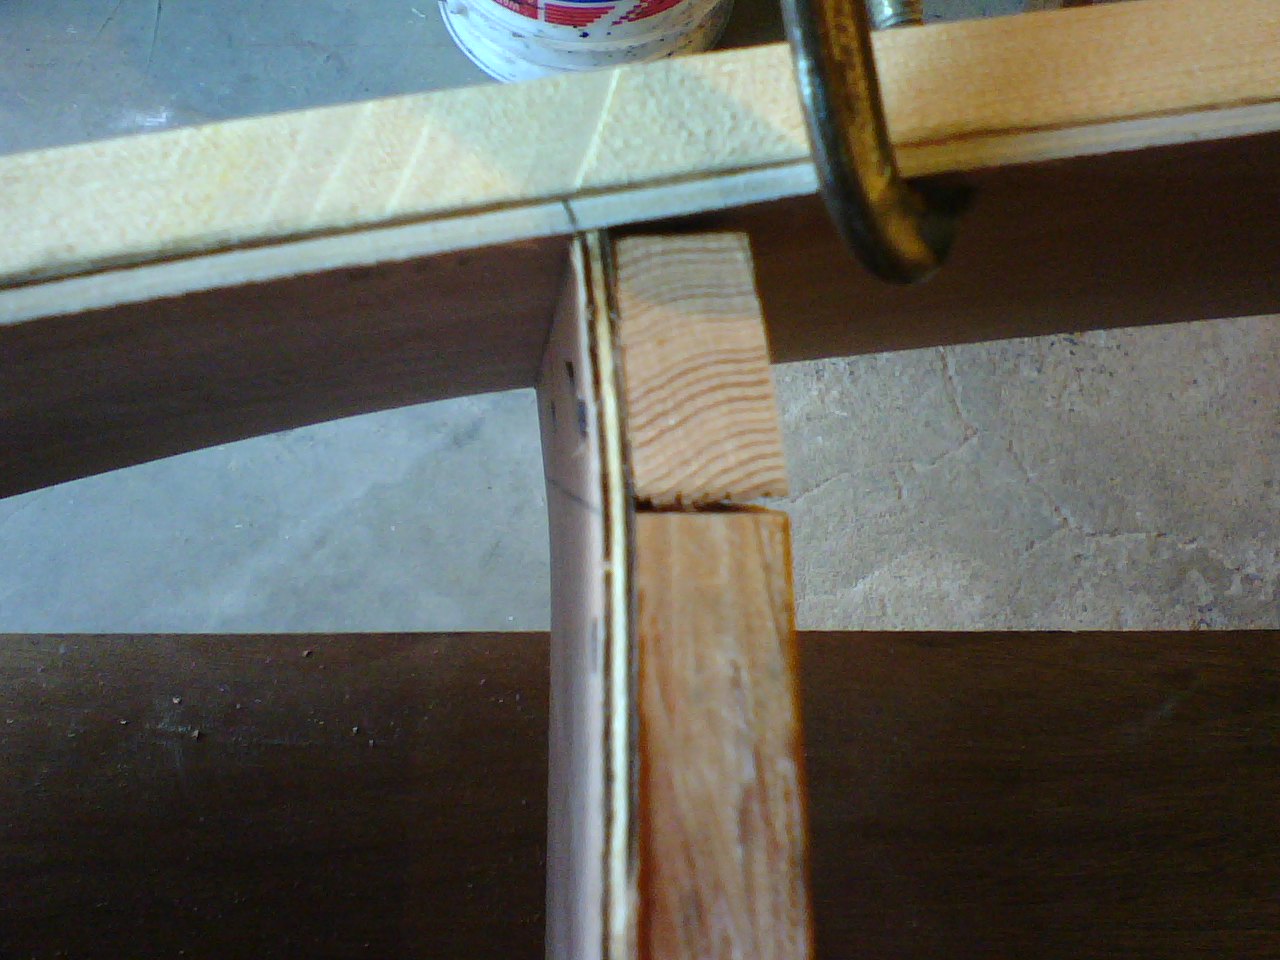
Today started off with fixing the transom frame that cracked yesterday as I was trying to bend the chine into place.
cracked frame on transom.
The frame was made of pine and I replaced it with fir, which is what the port sided frame is made of.  Once I got this new piece cut and temporarily fastened I took it apart and glued up the transom.
Heavy weight on transom as glue sets.
I have still not done anything about the transom not fitting properly to the side panels.  I remeasured everything and found out what the mistake really was.  It seems that when I measured the side panels I left out a 7/8" measurement from the edge of the plywood sheet.  I even did it on both panels, P&S.  This makes the stern rise sharper than it is suppose to and might make getting the chine to fit a bit more challenging, as I am not going to get new plywood and make new side panels.
The side panel at the stern where it was cut out from the 4x8 sheet.
The lowest line is what I should have marked.
The line above it is almost an inch to high and the rise of the stern is much
sharper as a result.
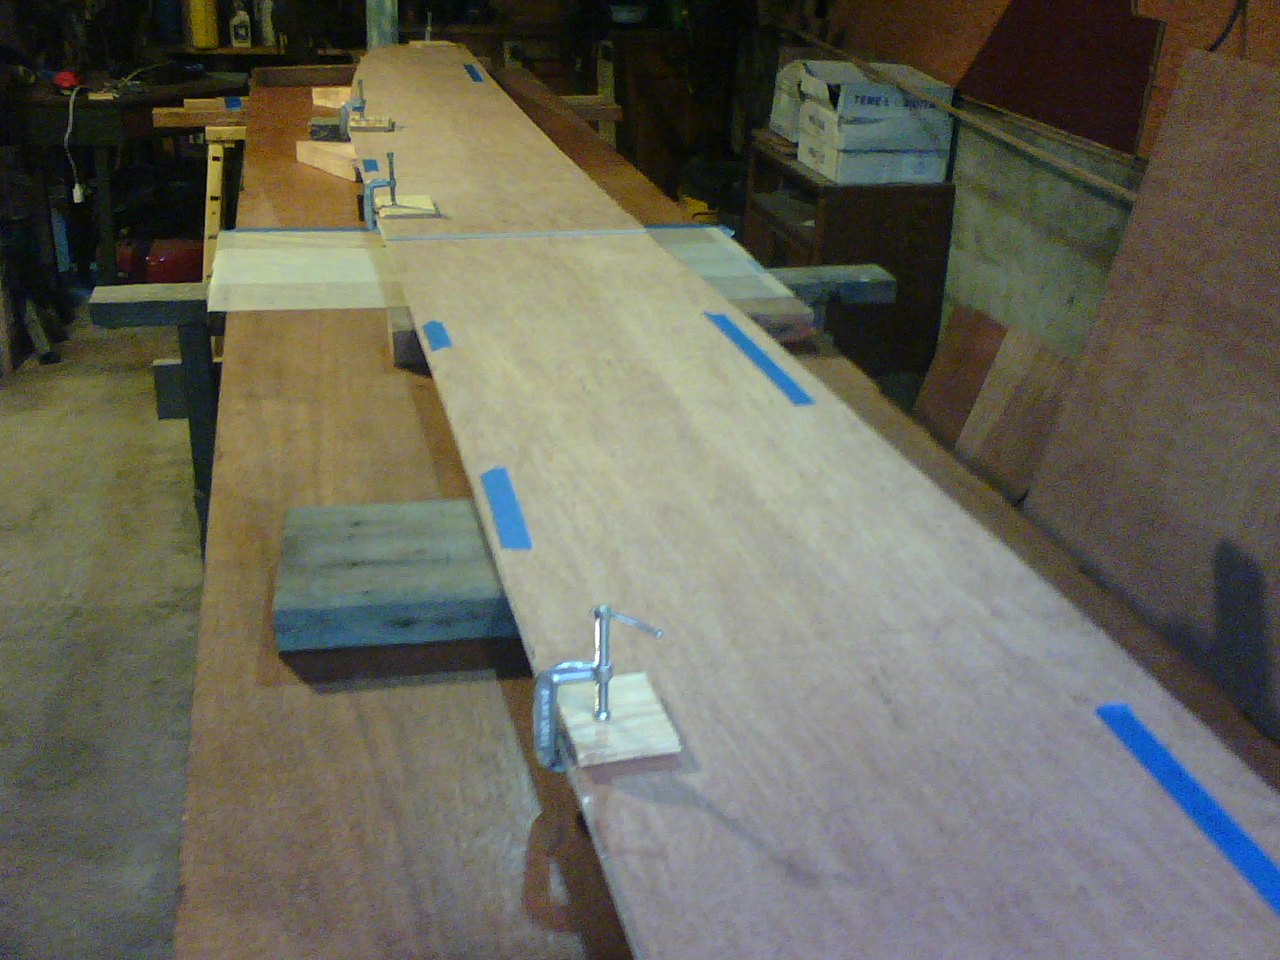
If I have to wet and steam the chines a bit to get them to take the sharper rise then that is what I will do.  Once when I put new toe rails on my cruising sailboat I just lashed the new and much beefier teak toe rails to the stanchions and waited a month or two as I did other projects and as the weather did its work to get the wood to take the shape.  When I went to get the final and stronger curve, the wood didn't have to bend as far because most it was almost there.  I have the chine clamped in place to get it to learn it's new shape.

While looking at the way the hull was not really making a fair curve I realized I needed to back off the screws in the side that attached them to the stations.  I took a screwdriver to every screw and backed them off them tightened until the sides just touched the station.
adjusting the fasteners on the side so they don't squeeze the sides out of shape
When I stepped back and looked at the lines they were much, much better.  The chines should pull them right into a nice shape.
I found an entry on 'Duckworks' from '09' that had this picture.
Jeff Edwards QT skiff with sailing rig added.
Nice paint and finish.
Nice sail.
The owner/builder, Jeff Edwards took a QT and added a sailing rig to it.  He said it was 'tippy' and that he didn't make good progress to windward.  I wonder if he got the placement of the sail and leeboard right.  It looks as though the halyard for the main could move forward a bit and that might maybe move the center of effort of the sail aft and help with his windward sailing.  He might also put a set of reefs, or two, in the sail to be able to reduce the area, lower the yard and decrease the lever on the boat so it is less tippy.  Maybe?
I do really like the way this boat is finished.  The wide hull with the bright chines, gunwale, stem, interior and decks.  He also added the fore and aft compartments but the aft compartment has a camber to the deck.  Very nice.  It also could be easily added to my boat as I have to much transom, or to little side planks, so I can put a curve and bevel in the part of the transom that is above the hull line and make a bulkhead that also is taller than the side.
I read in John Gardner's "Building Classic Small Craft" that he really doesn't approve of brass fasteners in small boats where the cost of bronze is so little above brass given so few pieces are needed.  I have to say he makes sense and I am inclined to get some bronze screws for the boat.  I think the marina store might have some, if not there is mail order, or online from Jamestown Dist.
I do like the look of this QT with the sailing rig, but I want my boat to row well and the lee board set up might hamper that.  Maybe just a down wind rig eventually, maybe.

Sunday, December 4, 2011

Take whats offered

The first order of business today was to get the saw horses free from under the boat table so that I could use them with the table saw, and so that I could get the table to a lower height.
Boat table (closet doors) with 18" legs


So, remember the 15 foot long plank of wood I found in the river and brought home?  It has been milled and made the chines and both laminations of the gunwales.  Thank you Hudson River.
One found plank becomes 6 pieces of chine and gunwale.


I wasn't sure if it would actually work since the amount I needed was close to what it's dimension were and that didn't include loss from saw cuts.  I was also worried about it not being clear wood.  I cut the bevels on 4 of the pieces(chines and first layer of gunwale) using the table saw set on the 23 degree angle as per the plans.  I realize now that the plans call for the finished pieces to be 3/4" x 1 1/4 ", and I left them at 1 /1/2" of the found wood.  I think I will try and bend them at that size.
 I left the last two pieces for the outer gunwale layer that I found 2 screws in with a scream and sparks from the table saw.  I removed the temporary battens that I had on the chine and I clamped the new and beveled chines on to see how they'd do with the shape.  No breaks or cracks so far.
Beveled chines clamped in place
to get them familiar with their new shape.
station flexing slightly!
Notice the gap between the side cleat and the bottom one.
I did notice that some of the station molds had suffered a little.  Maybe it's because of the thin plywood or maybe I just didn't use enough fasteners but some of them were flexing a little where the side cleat meets the bottom cleat.  I added some fasteners to help it out.  I could just add a cleat to the other side of the station to back it up.  It may not be necessary.
Brass brads as clinch nails on
scarf.
I got out a 6lb. sledge and a peen hammer and the escutcheon nails and put in fasteners on the scarf on the side planks.  I don't know if they are necessary or if they help at all, but it was fun to clinch them over, working as I have seen pictures of real boat builders do on really nice boats.
glue joint on scarf with fasteners.
The glue is pretty smooth and need little sanding.
The glue joint seems really good and filled by the Gorilla glue.  I am not sure how it will hold up so the fasteners are a back up.

I only worked for a few hours and most of that was cutting the new legs for the work table and getting that all set up.  I am very happy about the found wood working for the boat as it was just what I needed. I believe it is a pine, at least it smell like it's pine.  I am enjoying looking at the lines of the boat as they start to take shape.  It is strange how my fondness is growing for this little boat as each step of the construction reveals something that is a little more like a boat, and boats have been so good to me.  I hope that this one and I will get on as well as I have with my other boats.

I guess that it is time to glue and fasten the chines.

Friday, December 2, 2011

Taking shape


Getting the transom to the right shape was a little interesting.  I cut the side pieces long and wide then put the bevel on the sides to measurements.  I then attached them and the bottom piece and cut the length wise bevel all at one pass.  After that I attached the top piece.

cutting bottom bevel on transom.
I ended up with a very nicely put together piece, even if temporary.  I will take it apart and glue it all up and re-fasten it.


transom with bevels.
The tragic thing is that I measured the height wrong and the transom is 1 inch to tall!  Better than to short though.
1inch to tall transom.
You can see the centerline mark on the table that I use to line up
the stations so that it will sit in true shape
until I get back to work on it.
I decided to go ahead and attach the stations.  I hadn't marked the lines for them on the outside, so I did that first then managed to screw the stations in place.
A boat shape begins
The bow is the hardest part to get together.  I am thinking of adding an external stem.

stem temporarily attached.  Cut long and will be trimmed later.
I think I want it to stand proud and put a painter thru it.
I had some long strips of pine that are 1"x3/4" and I clamped them on just to see how the hull would line up and what the lines looked like.  I need to buy more clamps!
temporary chines clamped on.
I like the lines of the boat now that I can see them.  I was afraid it might be to boxy looking but it really isn't.  It kind of looks lean and as if it will row quite well.

I have yet to mill the chines and the gunwales.  During a row on the river last week I found a 2x6 that I towed home for some reason.  Today I measured it and it is 15' long.  I will try to mill it to get at least some of the pieces I need from it.
Found wood 15'x6"x2" that will become the chines and hopefully
the gunwales.  For now it's a bench for a dog.
It is a pretty good feeling to see the shape of the boat up there on the stands.  I have to leave it for a few days but that is probably best anyway.
I am still undecided about getting thicker plywood for the bottom.  I'm worried about stepping thru the thinner stuff.
The scarfs seem to be pretty strong.

Thursday, December 1, 2011

Stations framed

Today I got the frames for the stations all cut out as well as the stem and transom.

Stations with framing.  A good view of my closet door boat building frame.

I eventually got all the frames attached to the stations, but am waiting to do the transom since it needs to be glued as well.
I have decided that I will put the bulkheads in after I get the side panels shaped.  I hope to use the stations #4 and #10 for the bulkheads.  I will have to figure out the bevel on the edges where they meet the sides.  I am adding a vertical piece on the transom and the bulkheads to help with the weight of the deck or anyone leaning on it.

Wednesday, November 30, 2011

4=2


After letting the 4 pieces that make up the side panels sit for a day while I was away, I now have 2 side panels.  The Gorilla Glue seemed to do alright.
side panel scarf
To apply the glue I wet the wood on the scarf and I put the glue on the panels with a scraper/putty knife so as to keep the amount to a minimum and also to make sure that coverage was complete.  A little glue oozed out and foamed up but not much and that was taken down with a chisel as a knife.
top: butt plate at scarf.
 bottom:  front of panel after gluing. gap is just filled
After cleaning up the excess glue I lined up the 2 side panels face to face to see how true a match I had.  The tip of the bow and the tip of the stern lined up perfectly and most of the after panels were just right.  The forward panels were slightly off in a few places and I am inclined to think that this was due to sloppy measurements and fat pencil lines, and sloppy cuts.  I marked the places that needed fixing with tape and took a sureform to them until I had 2 matching sides.  If the lines, the sheer and bottom are not fair at least the two sides will be symmetric.
The blue tape indicates places the 2 sides need to be trimmed to match.
I started in on putting the framing on the transom.  I didn't get to far before the cold of the evening took over the garage and I was done for the day.
Transom as framing is added.
I am cutting the frames for the stations from fir 2x4 scraps.  I will fasten and glue them to the plywood panels.  I am keeping station 10 and 4 as bulkheads so I will make those and the transom a bit different than stations 2 and 7.  For fasteners I decided to try using brass wood screws.  I am not sure how lasting they will be.  I bought some stainless steel shake nails, that look like ring nails.  I'm thinking of using these to fasten the bulkheads to the side panels.
brass pins used as clinch nail in test piece seemed to work alright.

I also bought some brass brads or eschutcheon pins that I am thinking of using as clinch nails for a mechanical fastener on the side panel scarf.  I am really ignorant to the cons of using brass.

I think I will have to take my time to get all the framing cut and applied to the stations.  It is getting cold these days so that may slow me down as well.  It is nice to have gotten something done, a step is a step.


Monday, November 28, 2011

A sticky situation

Today I finished cutting out the rest of the parts from the plywood.  I tried using a circular saw set shallow, as is suggested in J. Mackalaks book, but I really didn't like it as much as using the jig saw and the cut wasn't as clean as the jig saw either.

In the plans form 10 is taken in 2 pieces from two different sheets of ply.  I found space to cut it out as one piece  in space that is not claimed by the parts of the boat and cut it out this way.  this is especially good since I plan to make form 10 into a bulkhead and the forward end of the after compartment.

To scarf the foreward and the after parts of the sides together I chose to use a butt block and glue as is suggested in the construction instructions.  I also chose not to use any fasteners on this scarf, as the designer said he has done.

glueing up the side panels
I read in Iain Oughtred's book on clinker lapstrake plywood boat building that he used 4x8 sheets of plywood cut in half length wise to make long coffin like boxes with 3 sides that when laid down on the shop floor become the building platform.  He uses this as a substitute for a building jig or ladder.  I didn't have the spare ply to use but I did have a bunch of old closed doors that I haven't any use for.  Actually I used two of them to roof my chicken coop.  I put these doors on saw horses and fastened them end to end and to the horses and they make a 13 foot table that is just big enough to glue up both side planks at the same time.  I am thinking about making shorter horses for this "boat building station" as right now they are 35" off the ground.  24'' or so would be better.  But for now I like my flat long work table.

My closet door boat building station.  Two 6'6" x 3' closet doors scarfed end to end on saw horses.
Makes a long flat surface that I can nail into.  The doors are hollow core so only the edges are structural.

I can't work on the boat tomorrow so that will give the glue time to set.  I used a 3/4x4'' board on top of the butt scarfs and drove a screw thru it to the table at the center to clamp the scarf.  I then put a 4'long angle iron, very heavy across the 2 scarfs and clamped it to the saw horses, then added a 30 lb. weight to the whole thing.

I am using "Gorrilla Glue" and am a little concerned about the expansion of it.  I could hear it as it pushed out of the joint almost immediately.  I am wondering if the pressure of the clamp increased it's rate of cure some?  I clamped the side panels to the bench and my hope is the the foam glue will fill the gap on the outside, but not to much.  Guess I'll find out on Wednesday.

I have decided not to add any layers to the hull planks but I may add something to the bottom in the cockpit area.

Sunday, November 27, 2011

The compromise

I just like this.
Today I cut the sheer line on the side panels.  Again I used a pull saw and my arms.  I cut a little wide and then used a plane and sureform down to the line.  This took a lot of time, but it was time I really enjoyed.  It was a nice day and the big doors were open to the day.  Later when I found I had a little time I came back to the project.  Since I had only a little time I thought I'd try using the jigsaw to maybe get one of the after side panels cut.  I took my time and moved the saw very slowly.  It was just what I had expected.  I made a very nice cut, right on the line, but leaving it.  No plane or sureform needed.  It went pretty quickly too, in fact I cut both P&S panels out in less time than it took me to cut one by hand.  The other part of using the power jig saw that was just as I had anticipated was the whining noise of the motor and the ring in my ears that remained when I turned it off.  While using the jig saw I couldn't hear the acoustic guitar recording I had on the stereo as I could while using the hand saw.

So I have to choose.  I am sure that the compromise will be that when I want to get somethings done and a time table is in mind, I may use the power tools.  When I just want to enjoy the experience and the day or some music, it will be hand tools.  I will also choose the hand tools when I want to hone my skills with them for future projects that will require more technique and higher tolerances.

I am still worried about the flimsiness of the 5mm luan for this boat.  I have thought about just doubling all the panels and then glueing, or laminating I guess you'd call it, them together to have a 10 mm hull thickness.  That's slightly over 3/8 of an inch while the plans call for 1/4 inch.  Price wise it comes out about the same as if I had bought the 1/4 inch to begin with, but I didn't like plywood that was available in that size with all the footballs and one side a little rough.

One advantage might be that I could offset the scarphs and not have to use butt blocks.  I am not sure and may not be able to decide until I have already nailed the side panels to the stations.

Friday, November 25, 2011

Thanksgiving

THANKS FOR THE chance to build a boat of my very own, for the space in which to build it, for the time and resources, for the dream of it.

work table with wood stove in the background.


11/25- (3hrs) 
finished drawing fair curves for top and bottom of side panels.  When I took away the battens and stood back to examine the lines I noticed something wrong with the starboard side panel.
clamping the batten to nails driven into the plywood at station marks

 It was subtle but not quite right.  I stared at it for a while then took up measuring all my marks.  As it turns out I had made an 1/8th inch mistake on frame 7.  That 1/8th inch made the bottom seem all wrong and squirrelly.
cutting side panels
Cut out foreword panels, P&S, and form #2 and 1/2 form #10.  I used a japanese pull saw to cut the patterns.  The Jim Machalak recommends using a shallow set circular saw but it was a really nice day out, warm and blu skies, and I had the big doors open in the shop and the thought of hearing power tools just hit me wrong.  The pull saw worked just fine.  I cut just on or outside the lines and will plane down to the lines later.  This luan is very thin and I worry that it won't be strong enough to hold it's own shape or that it might flex.  I think adding frames to the boat would not be difficult or problematic and I could even put stringers on the added frames if needed.
After cutting out station 2 panel I tried to use the ban saw to get close to the line but I think the hand saw and the plane or sureform are much cleaner.  The added time and effort are kind like meditation, calming.
station 2 and P&S forward side panels.
I realize that cut out the bow and bottom of the foreword panels but I forgot to cut the sheer line.  I'll get back to it another time.  I am trying to plan ahead for the compartments I want to have forward and aft.  I was hoping it would be as simple as leaving in station #2 and #10, and it may yet prove to be, but I am sure I will have to add a shelf and stringers athwart ship to keep from going thru the decks.  


A beginning

SO IT BEGINS with a step.  I suppose the first step was deciding on a design.  In order to make that step I had to make a list of things I wanted the boat to be.  The list seemed to change every time I revisited it.  In the end it got smaller and that was what allowed me to pick a design.
I searched the web and all the books I could find then decided that given my lack of experience or confidence in my abilities in this discipline, I would look toward those boats intended for the first time amateur builder.  I bought Jim Michalak's book "Boat building for Beginners, and beyond".  This book is so down to earth and unassuming in it's tone that it seemed just the right thing.  The book includes plans for about 7 boats, including the QT rowing skiff.

QT ROWING SKIFF 
13' X 45", 75 POUNDS EMPTY
Designer, Jim Michalak

I knew I was going to do it when I went to the local lumberyard and bought the first of the materials.  I came home and started clearing the spot in the shop that I had in my mind for boat building.  I also rummaged thru the bins of "stuff" I have and found 3 light fixtures that I then wired up to the ceiling to give the needed coverage of light.


3 -4x8x5.2mil. Lauan plywood $13.10ea $39.30 11/15/11
1 -Gorilla glue 18oz. $15.99 11/15/11

11/23- (5hrs.)
Laid out ply in shop and drew the patterns of the sides and 2.5 of the frames.
-Cut a 3/8"x3/4" batten from clear pine.
-finish nails in stations and clamped batten to nails, drew bottom curve.
In this space one can either store a car or build a boat.  Not a tough choice really.

A SKIFF wind blows the autumn leaves from the trees

For a long time I have had dreams & aspirations of building myself a wooden boat.  I have also had real knowledge of my limitations as a craftsman or carpenter.  The desire to become better at something that I feel limited in has only made me want to build a boat even more.  Well as with most things, baby steps can often be the best way to start.
I have often built my own furniture and done remodel work on my homes, but none of this could be considered in the same class as the craft that is building a wooden boat.  So, I am cheating, kind of.
I have decided to build a 13' rowing skiff in plywood construction.  It is a very simple boat.  Plywood though wood, is also not the same as a plank or solid wood boat.  I chose to build in plywood for two reasons.  The first is that it is wood and simple designs can be found using it.  The second reason is that the boat I want to build will be dry stored, that is it will be wet then dry then wet.  This kind of life can be very hard on a solid wood boat because of the swelling and shrinkage of the wood during it's life in the two different worlds.  I wanted a boat that I could store at home and then transport to the water in the back of my truck, thus saving me the fees of a marina or club.
I have a 2 car garage that is up a steep drive and during the cold and snowy months is often inaccessible in my cars.  It serves much better as a workshop for the house and now as a boatbuilding shop.  Working in there during the winter with the wood stove burning and the cold sneaking in the cracks of the siding is a strangely attractive idea to me.
I have no great illusions that just because I want to be a boat builder that I will be any good at it.  I am pretty sure that I can build myself a decent craft that will keep me afloat upon the water, and in the end I suppose that is enough.
I hope that this project, if it goes well and brings me joy and satisfaction, and most importantly, at the end a little boat to row upon the river and explore it's shores, will be the first of at least a couple of boat building projects.  If someday I should build a boat that is handsome enough to catch the eye of some other romantic fool who has dreams of being out in the water when he could be at home in a chair under a tree, and that dreamer asks me if I might part with the little boat, or build one like it for him, then I suppose I might consider myself a boat builder, but for now, the baby steps all I can manage.  I have decided on a boat design.  No small feat really.  I have put down money for wood to build her with.  I have even begun the process of measuring and then putting down lines and shapes on the wood.  It is a magical moment when the little drawings are recreated in full scale on the floor of the shop and the essence of a boat starts to be sensed hidden in the wood and fasteners and glues and ideas scattered all about the shop.
Autumn seems the right time to start to build a boat.  As the water gets cold and looses some of it's appeal, and as the wind gets blustery to the point of making being upon the water a slightly risky affair, and as more boats are seen propped up on cradles and up on stands, drying out for the winter months, it seems to be just right to be involved in dreaming and planning and carving out, not to far from the warmth of the fire, a little craft of boat of wood.